It's
easy to include variable Mail Merge Photos, Logos and Signatures in Microsoft® Word
Mail Merge
With OnMerge Images Microsoft
Word Add-in, it's easy to include personalized images in your letters.
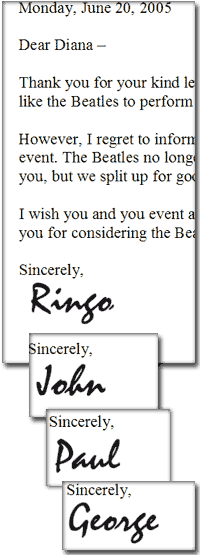
This example shows
different scanned signatures merged with different letters, but there's
no limit to what you can customize: letterheads, sender's photo,
recipient's photo, clip art, photos related to the letter's contents...
OnMerge Images makes
it as easy—many folks say it's easier—to merge photos as
it is to mail-merge text fields. If you have the images, OnMerge
Images and Microsoft Word can merge them into your letters.
I'm going to show you how easy it is to mail merge a batch of letters that each have a different person's signature on them. For example, an office sending out a mailing often wants each customer's own sales rep to sign the letters.
In this sample I'm going to have a little bit of fun: I'll bet there are still people out there writing to the Beatles and asking them to perform. I've written a letter that gently declines the invitation, and I'll personalize it with the date, the name of the person the letter is going to, and the signature of the Beatle who is supposedly sending the letter.
These examples show what the finished product will look like. You can find a copy of all of the files I'm showing in this video in the OnMerge Images Samples subfolder that OnMerge installs in your My Documents folder. Both the evaluation version and the full version with OnMerge come with the sample files.
Before I write the letter, I've prepared a simple sample database in an Excel spreadsheet. I'm only demonstrating basic customization here, so the spreadsheet has only two columns, namely one for sender's name and one for the recipient's name.
I've also prepared the scanned signatures, each in its own graphics file. You can use most standard graphics files, but for signatures I recommend GIF, TIF or BMP files. Just for signatures, you'll want to avoid using JPEG files if possible because they're usually not crisp enough, and because JPEG files often print the white background as a pale gray box.
Let me point out something very important that you'll want to notice here. The signature files are all named according to a pattern that relates back to the Excel data file. You can make up whatever pattern that makes sense in your situation, remembering that file names must be unique while still fitting into the pattern. For example, naming signature files with just a first name as I'm doing here probably isn't a good idea if you have a whole bunch of guys named John running around. Here, I've named each signature file with the same first name as in the data file, followed by a dash and the word "Signature."
I've pre-written the letter's text. I'll use the Mail Merge Wizard to make this easier, so select Tools, Letters and Mailings, Mail Merge Wizard. It'll show up on the right-hand side of Word. I'm writing a letter, so I select Letters if it's not already selected, then I press Next.
In Step 2, I've already opened the letter that I want to use for my merge so I just make sure that "Use the current document" is checked. If you wanted to import a document from another file, you would check "Start from existing document." I go onto the next step by clicking Next.
In Step 3, I need to pick the Excel file that I prepared earlier as the data source. I click "Use an existing list," click "Select a different list," and then navigate to select the Excel file. The first sheet in the list is almost always the one you want, so make sure it's selected and press OK, and then OK again. I'm done selecting the data source, so I again click Next.
The letter's written and it's time to insert the personalization. The date and the sender's name are just standard mail merge stuff, so I'll just go ahead and do it quickly since you're probably familiar with this.
So far I've just been doing standard Mail Merge stuff, but now we've come to the good part. To insert the signature, place the cursor after "Sincerely" and press Enter. Make sure you can see the Mail Merge Toolbar near the top of Word's screen. If you can't, just click Tools, Customize, Toolbars and check the "Mail Merge" box, then click Close. Now, just click on the OnMerge Images button on the Mail Merge Toolbar. It's usually the seventh from the left on that toolbar.
The first thing I need to do is to tell OnMerge what folder all of the signature files are in. Click "Browse," navigate to the folder, and press OK. You do not need to select individual graphics files in the folder -- just the folder. You'll remember that the pattern for the signature file names is the person's first name, followed by a dash and that the word signature. The next six lines below let you specify six pieces of text that will be jammed together to create the file name.
Here, the first part of each name is a database lookup, so in the first row I select a Type of "Merge Database" and to the right I select the Beatle field. In the left column, you'll notice a preview of the value that's stored in the first database record.
The second part of the name in this example is always the same: a dash and the word "Signature." OnMerge just calls that text, which is the default Type value, so I can just skip to the rightmost box in the second row and type in dash signature. As I type, notice that the text is also shown in the left-hand column and is also shown jammed together with the rest of the file name in the gray box at the very top left. As soon as I finish typing, OnMerge notices that the pattern I just supplied matches one of the files, so it shows you a preview of the file in the top right corner. If you want to check the preview for different data records, you can use the arrow buttons to the left of the image preview. I'm almost done, so I press OK.
By default, OnMerge fits each signature into a 1" x 1" box. That's about two and half centimeters. The name John is short so this looks alright, but notice how OnMerge has to shrink George to fit inside the one by one box without distorting the images' proportions. Normally, that's how OnMerge works: it shrinks or stretches each image until it just fits inside an invisible box. Typically, either the sides or the top and bottom of the image will touch the invisible box since each image will probably be a slightly different shape than the box. There is an option in OnMerge to change that behavior, but I want the normal behavior here, namely that all signatures come out the same height and have different widths.
I'm going to set the invisible box to be about three quarters of an inch high and very wide so that it can accommodate any signature. To do that, I click on the image and drag the little handles to the maximum size that I want the invisible box to have. The image will appear distorted but don't mind that, because after I've finished sizing the box and I click outside the image, it'll snap back to its normal proportions. You don't see the invisible box on the screen, but OnMerge will remember it and use it to size images when you merge.
I'm done setting up the letter, so this is a really good time to save it. I press Next in the Mail Merge Wizard, and I can preview the various letters and then go on to the final step by pressing Next. You can now either print the completed merge, or copy the completed merge into a new Word document by pressing "Edit individual letters."
This is a simple introduction to some of the things that OnMerge can do. You'll find plenty of other examples as well as a free downloadable evaluation version of OnMerge on our website at www.OnMerge.com.